Most classes are taught using black ink, which is cheaper I guess, and it's easy to get good effects with black and white. And usually the teacher is concentrating on showing you the process and technique, not the aesthetic qualities of what you are producing.
So I was very very happy to come across a specialised colour etching class at Morley College. It is taught by Rob White, a master printmaker who has worked for a long time in editioning studios like Thumbprint and Paupers Press and is a really good (and patient) teacher too.
This class was about experimenting with different inks and layers to produce more multilayered, colourful work.
I took a reaaaaaally long time to make my three zinc plates, so didn't get to play around with the inks as much as I'd have liked. But I'm still happy with the outcome and on the way to using more colour, now I've broken through the colour taboo.
Hard ground etching of tree trunk & branches on plate number 1
I will always, always forget to reverse the image on the plate. This was meant to be going the other way. D'oh.
 Leaves painted on with sugar lift solution.
You can sometimes find little pots of ready made sugar lift solutions in art shops, or there's lots of recipes to make it yourself online.
Or you can use the excellently named Camp Coffee (I found it a bit more runny to use though).
Once the sugar lift solution has dried, you can coat the entire plate with liquid etching ground or straw hat varnish.
Like so. The sugar lift will bubble up a bit.
You then immerse the plate in hot water.
The sugar lift will dissolve, leaving marks on the plate which you can then aquatint. These will print out as positives.
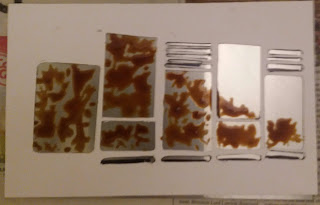
This is what the plate looks like once it has been aquatinted, and the liquid hard ground had been taken off.
This is plate number two.
The windows were first etched with a soft ground. I used stop out varnish so that the rectangle shapes will print out white, and aquatinted the rest so that it would print in a darker tone (full disclosure; I messed up the aquatint, Rob did it in the end.)
This is plate number three, made at home.
I used a paper stencil to position the sugar lift solution in the right place. This is Camp Coffee, it was a bit runny and didn't stay where you put it, so I ended up using stop out so that the marks weren't too big (otherwise you will get open bite)
Plate number 3, with added stop out, after sugar lift has been lifted, and ready to be aquatinted.
So the three plates were made, it was time to take a first proof and see what's what.
Oh no. I am not good with the colours. I couldn't even tell you what they are here - murky blue, murky green, murky grey I think.
This was before Rob did the aquatint properly for me on plate number two, as you can see the grey is printing very patchily, not as one solid tone.
In the final week, I decided on three colours (process blue, viridian, pale green). Rob advised using a little extender (this makes the ink more transparent) and some white ink in the mix.
Eh voila, this is the final print. I ran out of time, but pretty happy. At least it's not black and white. And I really learned a lot in this class.
Some close ups:


